Git is an excellent tool for programmers, one which I have yet to see the full potential of. Recently, I needed to get familiar with it for my job and a coworker suggested a few applications to use. All but one of the programs were for Macs (a problem, since I’m a PC user), and the only other program, GitHub for Windows, wasn’t exactly optimized for easy use with bitbucket. So I just stuck with Git for Windows, the command line Git Bash.
After a few weeks, I needed to bring some fellow PC using coworkers up to speed with git and bitbucket. So I finally made an effort to figure out how to get GitHub for Windows working with bitbucket. Since everything I needed to know was scattered across the web, I decided to consolidate all that information in one place for my coworkers to use.
Important Update!!!
The people behind BitBucket, Atlassian, are running a beta for their windows git client: SourceTree for Windows. View my quick post about it.
Summary
This guide will help you setup GitHub for Windows to use bitbucket repositories on Windows 7 (and I suppose Vista too), and go over basic usage of GitHub for Windows. This guide combines information found on Atlassian’s guide to Git and bitbucket and Steve Bumbaugh’s Guide: “GitHub for Windows Client: For bitbucket”, and also experience I’ve gained from using Git, bitbucket, and GitHub for Windows.
I’ve successfully tested this process a few times now, but things tend to go wrong. So if you have any issues, add a comment and I will try to help you out. Also, if you had a problem and found the solution, add a comment describing what you did so I can add it to the guide.
Credit where Credit is Due
Steps 1 and 2 includes information consolidated from Atlassian’s guide to Git and bitbucket.
Step 3 includes information gathered from Steve Bumbaugh’s Guide: “GitHub for Windows Client: For bitbucket”
Special thanks to Russ Offord for testing this guide and helping me iron it out!
The Steps and The Skills
Step 1 – Install Git: Basic computer skills
Step 2 – Setup SSH with bitbucket: Basic computer skills
Step 3 – Install GitHub for Windows: Basic computer skills
Step 4 – Clone a Repository from Bitbucket: Basic Git learned from previous steps
Step 5 – Manage the Repository with GitHub for Windows: Basic computer skills
Step 6 – Commit Changes with GitHub for Windows: Basic computer skills
Prerequisite
Before getting started, you will need the following:
- A bitbucket account – I like them because they allow you to host private repositories on free accounts.
- A GitHub account – They don’t allow for private repositories on free accounts, but an account is needed for their software.
Step 1 – Install Git
- Download the latest version of Git for Windows (Right now they are all beta, that’s ok though!) and install it. It’s a straight forward process, so I won’t drone on about it. Just keep hitting “Next” and leave all of the defaults selected.
- Then, start Git Bash (Start –> All Programs –> Git –> Git Bash)

- According to atlassian, you should run these two commands in Git Bash. NOTE: Use the information you used with bitbucket for the values in quotes below.
1
2git config —global user.name "FIRST_NAME LAST_NAME"
git config —global user.email "MY_NAME@example.com"
Step 2 – Setup SSH Key with bitbucket
- Check if ssh is set up on your machine
1ssh –v
This is what I see:

If you don’t see something similar, go to the link I provided above, to Atlassian’s guide, in order to get SSH working right on your computer. - Now it’s time to create what is called a “Default Identity”
1ssh–keygen
- You will be prompted to type a filename for where you want the ssh key to be saved. Just hit Enter
- You will then be asked for a passphrase. This may seem counterintuitive, but just press Enter. At the time of this writing (07/13/2012), this is necessary to be able to use GitHub for Windows with bitbucket repositories
- Press Enter again to confirm the lack of a passphrase

Somehow my empty passwords didn’t match the first time O_o - The next thing we have to do is set up a config file. So go into your User directory (Start -> UserName) and open the folder called .ssh. Create a new text file here, call it config (no file extension), open it in your favorite text editor and type the following. NOTE: Replace “faison” with your bitbucket username. Also, the “tabs” are necessary.
1
2
3Host bitbucket.org
User faison
IdentityFile ~/.ssh/id_rsaIf you can’t make the file without an extension, just call it config.txt. After entering the information above, open Git Bash in the .ssh folder (right-click -> Git bash) and enter the following command:
1mv config.txt configThat command will rename config.txt as config
- After saving that file, go back into the .ssh folder and open id_rsa.pub in your text editor. Select all the text and copy it (Ctrl + A, Ctrl + C)
- Log in to bitbucket and go to your account settings (Hover over your Username in the nav menu, then click “Account”). On the following page, click SSH keys. Here’s the page:
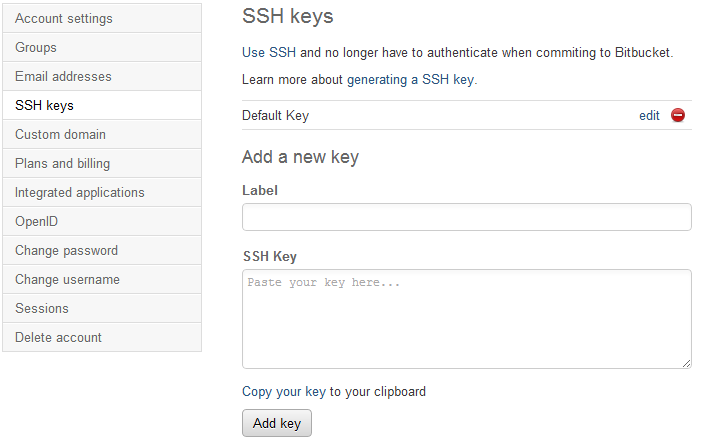
- In the Add a new key form, enter something like “Default key for computer-I’m-on” for the Label, and paste the contents from id_rsa.pub into the SSH Key field. Press Add keyand hope it works. NOTE: You will have to do this for every computer you want to use this on, eventually.

It Worked!
Step 3 – Install GitHub for Windows
- Download GitHub for Windows
- Install it, from what I could tell there is no customization during installation. When it’s done, GitHub for Windows will start automatically
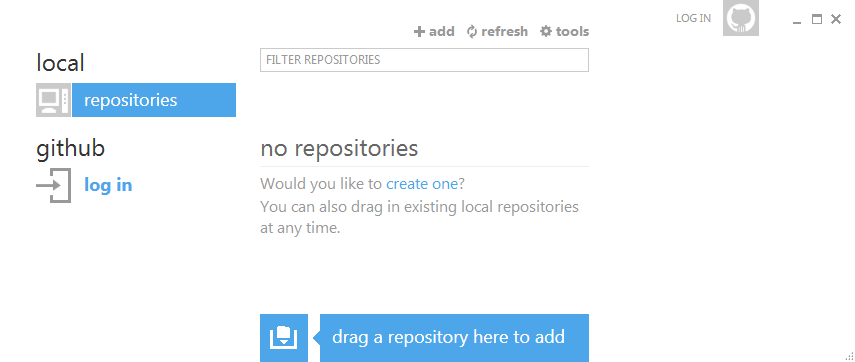
- Press Log In and enter your GitHub credentials. Then enter your name and email into the Configure Git section and press Continue. If you end up in the Repositories section, just skip.
- Now back in the .ssh directory from Step 2, open the newly created file, github_rsa.pub, in a text editor. Delete everything in this file, and paste the contents of id_rsa.pub into it.
- Now log into the GitHub Website. Click the Account Settings icon

Click SSH Keys, then click the Add SSH key button. - This is pretty much the same thing as before. Type something like “Default key for computer-I’m-on” for the Title and paste the contents from github_rsa.pub into the Key field. Press the Add key button to finish up.
Step 4 – Clone a Repository from Bitbucket
- Log in to bitbucket and go to the test repository I set up for this guide.
- Press the fork link

Just so you know where it is. - You are then presented with a form that allows you to choose the The then press the Fork repository button. This should bring you to the page for your newly forked repo.
- Now on your computer, open up a directory that you want to store your repository in. For this, I went with C:repos. Open the folder, Right-click in it, and choose Git Bash. NOTE: I didn’t get this option in the Documents directory.
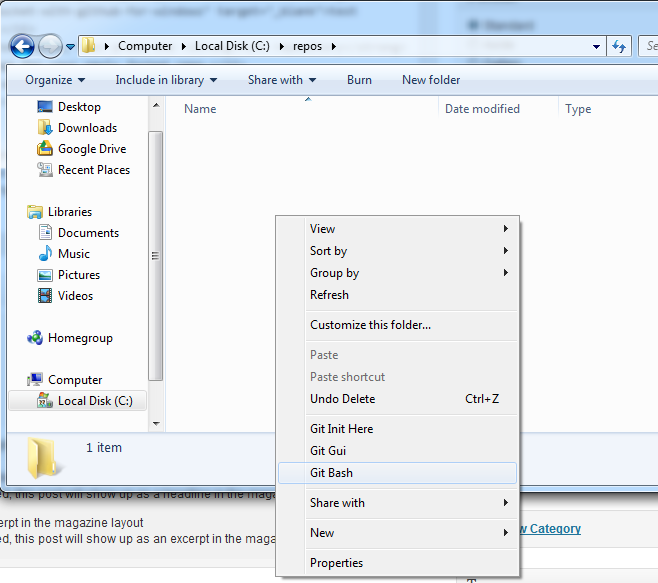
This will start Git Bash in the current folder and eliminate the need to use command line commands to get to the right directory. - Type the clone command (into Git Bash) that is found on the new repository page that you created on bitbucket, and hit enter.

Type everything after the ‘$’ - I was prompted: “The authenticity of host ‘bitbucket.org (207.223.240.182)’ can’t be established.” Just type yes and hit enter to continue the cloning. This should only happen the first time you clone a bitbucket repository on a computer.
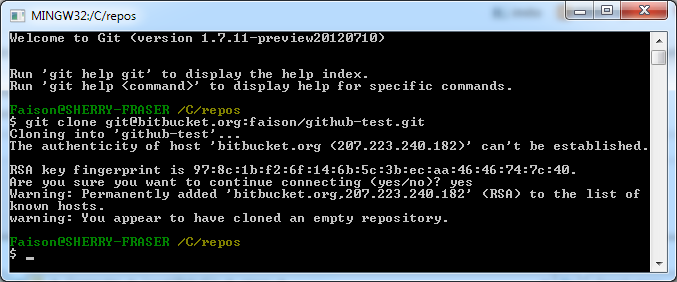
Yeah, this screenshot is me cloning a different repo, what’s it to ya? - After the Cloning succeeds, you will have a new folder with the same name of the repository.
Step 5 – Manage the Repository with GitHub for Windows
- Drag the folder that contains your newly cloned repository, onto GitHub for Windows
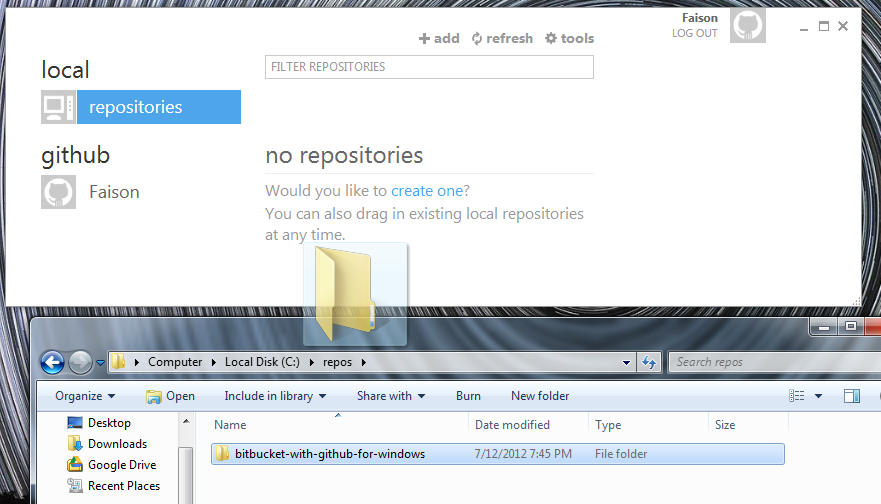
Here’s how it should look after you drop the repository: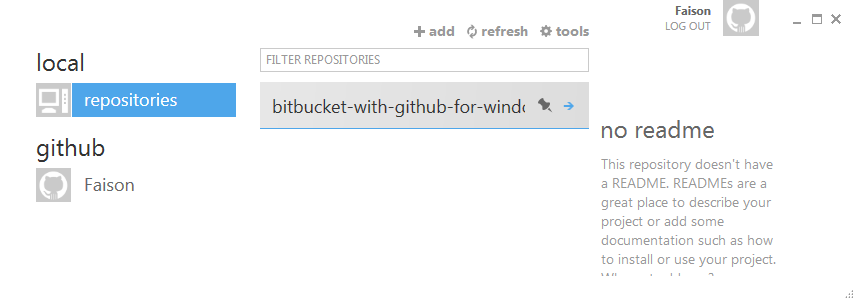
Now it’s in GitHub for Windows!
Step 6 – Commit Changes with GitHub for Windows
- Now let’s add a new file into the repository folder, just to make sure everything is working right
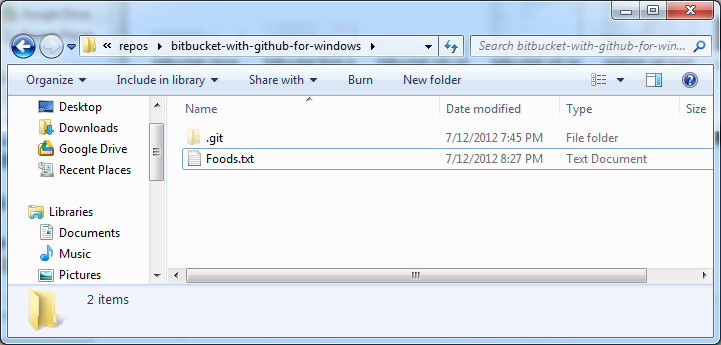
- In GitHub for windows list of repositories, double-click the newly added repository. You should see a prompt regarding uncommitted changes
- Type in a commit message that reflects your changes and press the Commit button.
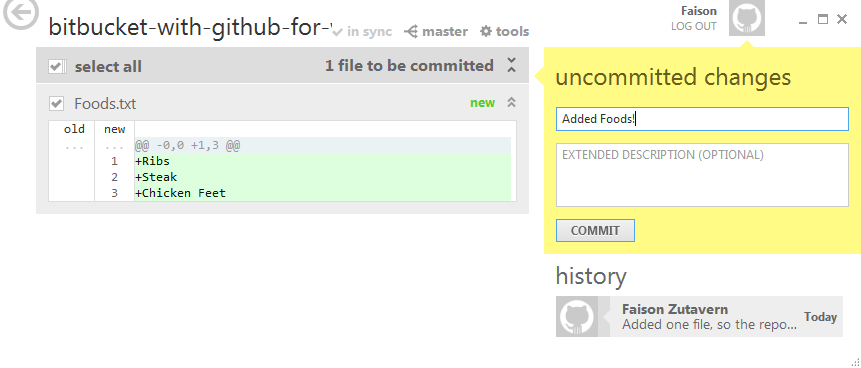
- The in sync text will now turn blue and change to say sync, indicating that you should sync it with the bitbucket repository. You can wait to bank a few commits, but we’re going to sync right away. Click sync.

Click the blue text 
Now you wait 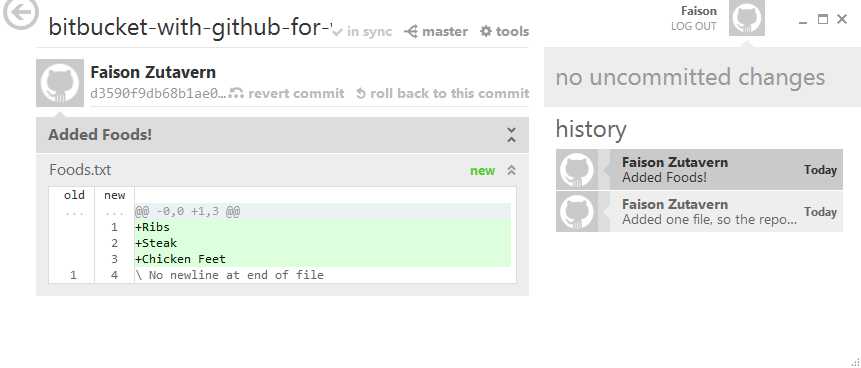
And it’s done!
Conclusion
So that is how you setup GitHub for Windows to use bitbucket repositories, and the basic way to use GitHub for Windows. If you want to setup multiple computers with GitHub for Windows, follow the complete guide. If you want to grab another repository to manage with GitHub for Windows, all you have to do is Clone the repository from bitbucket, Drag and Drop it into GitHub for Windows, do some work, and commit.
This is still something that I’m decently new with and I’ve only used this setup with one person working on a repository at a time, so comments on how well this works in a multi-user setting would be greatly appreciated. In fact, all real feedback and comments would definitely go a long way in helping me to refine this guide, to fix any missteps in my usage, and to improve my ability to write in general.
Thanks again, everyone!
Leave a Reply