Category: Programming

  • Send a Pull Request to Another Fork on GitHub

    Send a Pull Request to Another Fork on GitHub

    Over the past few months, I’ve been working on merging the WordPress plugin SEO Extended into WordPress SEO by Yoast. The whole process taught me many great things about git, GitHub, and social coding. So today I’m going to share how to send a pull request to another person’s fork on GitHub!

    After I went through the effort of merging SEO Extended into my fork of WordPress SEO, I sent a pull request to the main repo on GitHub. Joost de Valk wanted to run a large beta test on the functionality added from SEO Extended, so he asked that I send a pull request to the fork maintained by Juliette Reinders Folmer. Figuring out how to send a pull request to the original repo I forked was hard enough, but after some blind clicking and guessing, I figured out how to send a pull request from my fork of WordPress SEO to Juliette’s fork of WordPress SEO.

    Here’s how you can send a pull request from your fork of a GitHub repo, to another person’s fork of that same GitHub repo:

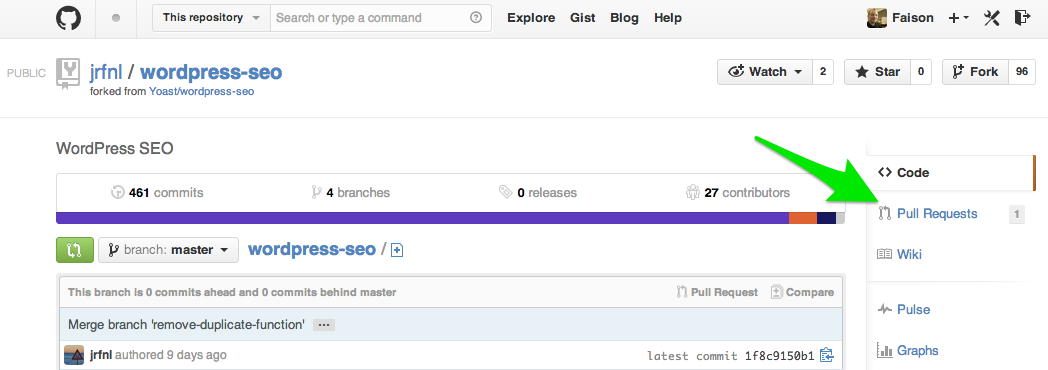
    Step 1 – Go to the GitHub page of the other person’s fork and click “Pull Requests”

    The location of "Pull Requests" on a GitHub repo

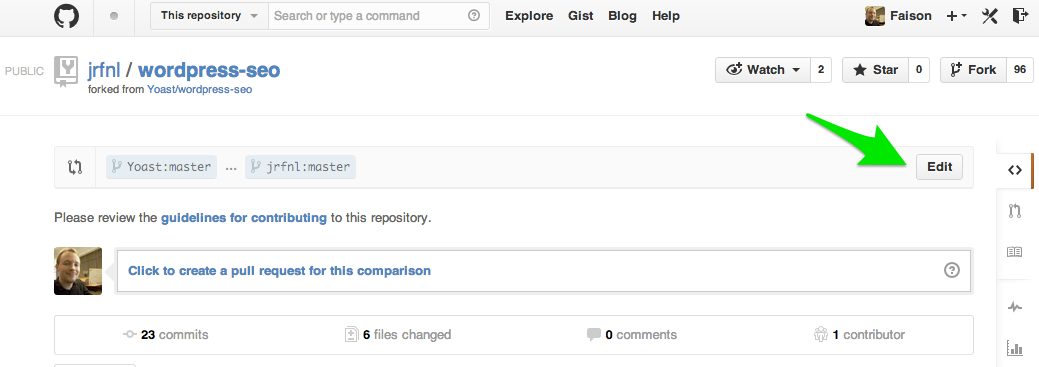
    Step 2 – On the Pull Requests page, click the button labeled “New pull request”

    Location of the "New pull request" button on GitHub

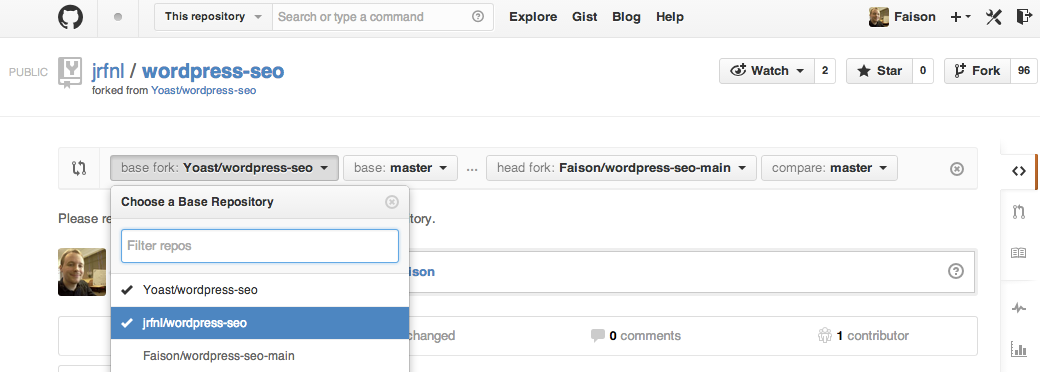
    Step 3 – Click the “Edit” button and change the head fork and base fork.

    Edit the GitHub repos being compared in the pull request

    I don’t know many of the terms used in Git and GitHub, but from what I gather the head fork is the repo you want to send in the pull request and the base fork is the repo you want to send your pull request to. So I chose my fork (Faison/wordpress-seo-main) for the head fork, and Juliette’s fork (jrfnl/wordpress-seo) for the base fork. For my pull request, I was also asked to send it to a specific branch of Juliette’s fork, so I used the dropdown next to the base fork to select the appropriate branch.

    Edit the base fork and head fork of a pull request

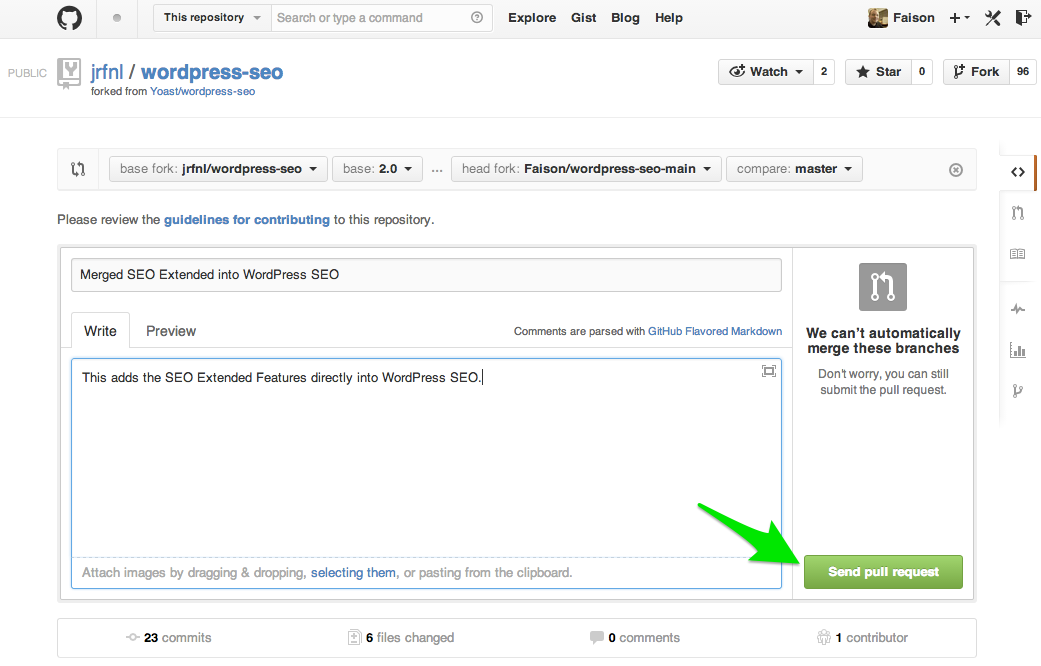
    Step 4 – Click the area that says “Click to create a pull request for this comparison” and add a title and message.

    For this step, you want to make sure you tell the person what your pull request is for. So for mine, I used the title “Merged SEO Extended into WordPress SEO”, and just explained that it was the same as the first pull request I sent to the main WordPress SEO repo.

    Step 5 – Send your pull request by clicking the button labeled “Send pull request”

    Send your pull request on GitHub

    After pressing that button, you successfully sent a pull request from your fork to another fork of the same GitHub repository! The next step is to wait for that person to merge the request or reply for some follow up questions.

    Start Contributing Today

    Figuring this out started me down the path of contributing to WordPress SEO much more than I first anticipated and it’s why I look forward to contributing to many more WordPress plugins in the future. Unlike me, you don’t have to spend time shooting in the dark, trying to find out how to accomplish this task. Now that you know how to send pull requests to other forks of the same GitHub repo, you have another valuable skill to help your social coding on GitHub. So go to the GitHub repo of one of your favourite WordPress plugins and start sending your pull requests today!

  • New Windows Git Client for Bitbutcket: SourceTree for Windows Beta

    Good news, everyone! The people behind Bitbucket, Atlassian, are running a beta for the Windows version of their Git client called SourceTree. Right now you have to sign up by giving them your email and hoping they choose you, but it could very well be worth it!

    I haven’t tried SourceTree for Windows yet, but I got my copy and will try to do some testing to share the experience. On a related note, one of my co-workers says the Mac version is the best free Git client he’s used yet, so let’s hope Atlassian is still on the right track.

    So sign up for your beta access to SourceTree for Windows and tell me about your experience!

  • Tell Me if My Site Looks Broken

    One day, a month or so ago, I was assigned to help a client renew their domain name. After digging up the website that our client registered their domain name at, I promptly went to browsing it (It’s always a good idea to get familiar with a website or application before attempting to guide a client through it). To my surprise, the site looked broken! When I say broken, I don’t mean that it needed someone to take the time to make it look better (See Example), I mean nothing was styled.

    My site if it was broken
    My site if it was broken

    Was I to tell our client to trust his credit card on that site? Not at all. (more…)

  • Setup Git and GitHub for Windows 7 for use with Bitbucket

    Git is an excellent tool for programmers, one which I have yet to see the full potential of. Recently, I needed to get familiar with it for my job and a coworker suggested a few applications to use. All but one of the programs were for Macs (a problem, since I’m a PC user), and the only other program, GitHub for Windows, wasn’t exactly optimized for easy use with bitbucket. So I just stuck with Git for Windows, the command line Git Bash.

    After a few weeks, I needed to bring some fellow PC using coworkers up to speed with git and bitbucket. So I finally made an effort to figure out how to get GitHub for Windows working with bitbucket. Since everything I needed to know was scattered across the web, I decided to consolidate all that information in one place for my coworkers to use.

    Important Update!!!

    The people behind BitBucket, Atlassian, are running a beta for their windows git client: SourceTree for Windows. View my quick post about it.

    Summary

    This guide will help you setup GitHub for Windows to use bitbucket repositories on Windows 7 (and I suppose Vista too), and go over basic usage of GitHub for Windows. This guide combines information found on Atlassian’s guide to Git and bitbucket and Steve Bumbaugh’s Guide: “GitHub for Windows Client: For bitbucket”, and also experience I’ve gained from using Git, bitbucket, and GitHub for Windows.

    I’ve successfully tested this process a few times now, but things tend to go wrong. So if you have any issues, add a comment and I will try to help you out. Also, if you had a problem and found the solution, add a comment describing what you did so I can add it to the guide.

    Credit where Credit is Due

    Steps 1 and 2 includes information consolidated from Atlassian’s guide to Git and bitbucket.
    Step 3 includes information gathered from Steve Bumbaugh’s Guide: “GitHub for Windows Client: For bitbucket”
    Special thanks to Russ Offord for testing this guide and helping me iron it out!

    The Steps and The Skills

    Step 1 – Install Git: Basic computer skills
    Step 2 – Setup SSH with bitbucket: Basic computer skills
    Step 3 – Install GitHub for Windows: Basic computer skills
    Step 4 – Clone a Repository from Bitbucket: Basic Git learned from previous steps
    Step 5 – Manage the Repository with GitHub for Windows: Basic computer skills
    Step 6 – Commit Changes with GitHub for Windows: Basic computer skills
    (more…)

  • Creating a WordPress Plugin to Export MySQL data as CSV

    Recently at work, a client requested the ability to export user browsing information as a Comma-separated values (CSV) file. I was asked if I could make this happen, and I was pretty sure I could figure it out. It took a couple of hours of research, but It was a fun and educational experience that lead me to new understandings of PHP, WordPress, and MySQL.

    I decided to share what I learned with as much concise detail as possible and with the same process I took, because without the extremely helpful guides from the programming communities online, I would not be as strong a programmer as I am today. So thank you everyone, and read ahead for the guide.

    Summary

    This guide will help you write a WordPress plugin that has an Admin Page which is accessible from the Tools menu on the WordPress Dashboard. It will use PHP to retrieve data from a MySQL database, format it as a CSV file, and send it to the browser to be downloaded without storing a file on the server.

    The Steps and The Skills

    Step 1 – Send a CSV file to the Browser: PHP
    Step 2 – Build the Database Query: MySQL, WordPress Database
    Step 3 – Access the WordPress Database: WordPress Development, PHP
    Step 4 – Make it a Plugin: WordPress Development, PHP, minimal HTML
    Step 5 – Activate and Use the Plugin: End results
    Update 1 – Add Content-Length Header: PHP
    (more…)